
Twitch has been the mainstay platform for gamers, musicians, and streaming celebs who want to broadcast live on the internet. The Twitch scene is a booming one that at any given time there is an average of 100 thousand Twitch channels streaming live and 2.5 million viewers.
Those are just staggering numbers that say how healthy the Twitch live-streaming industry is.
Video on demand is a feature that gives Twitch creators the ability to let their fans view their past broadcasts upon demand. VoD on Twitch enables creators to have their videos become viewable to their fans even after a live stream session ends.
If you are a Twitch creator, having VoD enabled for your content may have its inherent advantages and disadvantages. Live streaming is an unpredictable and random routine that creators may sometimes not want fans to re-watch streaming sessions that did not go too well.
Fortunately, Twitch streamers can learn how to delete Twitch VoD from their channel if they choose to. This article attempts to discuss how to delete VoDs on Twitch using a mobile device or a desktop PC, and will also discuss a few Twitch tips on how you can make deleting VoDs work for your channel.
How to Delete VoDs on Twitch
Although VoD content on Twitch are saved on the Twitch platform temporarily, it is always useful to know how to delete VoD content yourself.
This section of the article will give you a definitive guide on how to delete VoDs on Twitch.
Apply these steps if you would want to delete VoDs on your Twitch by using a desktop PC:
- Visit Twitch.tv on any web browser like Google Chrome or Mozilla Firefox and sign in to your Twitch account.
- Click on your Twitch channel’s profile picture to reveal a dropdown menu.
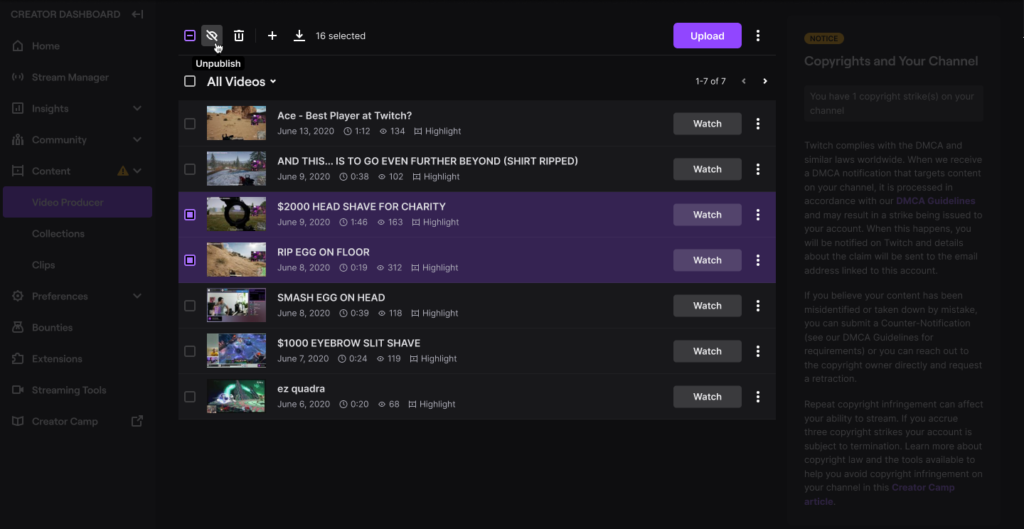
- Click the ‘Video Producer’ tab on the dropdown menu.
- A list of all your Twitch videos will appear upon clicking on the Video Producer tab.
- Tick the boxes of the videos that you want to delete to disable their VoD feature.
- Upon selecting the videos you want VoD disabled on, click on the trashcan icon just above the list of all your Twitch videos.
- Confirm their deletion, and you will now have disabled these videos to be viewed on-demand by your viewers and fans on Twitch.
There used to be a way to enable or disable the video-on-demand feature for Twitch videos through mobile devices. The Twitch mobile app used to let users turn on the Desktop mode to make features like the Video Producer menu available for tinkering.
Now, it seems that the only way you could disable on-demand viewing for your Twitch broadcasts is through the desktop PC method.
To disable video-on-demand options for your past live-stream broadcasts on your Twitch channel, you will have to use a desktop PC and do the steps we have discussed before this section of this article.
Now that you know how you can delete VoDs on Twitch, you will not have to worry about Twitch live-streaming sessions that you don’t want your fans to view again through video on demand.
How to Enable Video on Demand on Your Twitch Channel
If your Twitch channel does not automatically store your live stream videos for VoD, that just means you have not yet enabled your Twitch channel to temporarily store your broadcasts. Here is a step-by-step guide on how you can store your live stream sessions for VoD viewing:
- Visit twitch.tv using any internet browser like Google Chrome or Mozilla Firefox.
- Sign in to your account and click on your profile picture to reveal a dropdown menu.
- Pick and click on the ‘Creator Dashboard’ on the dropdown menu.
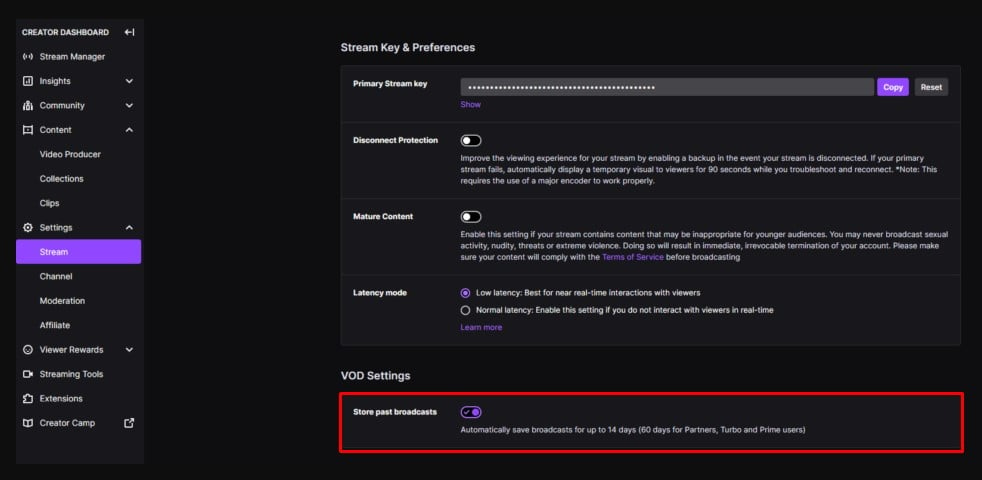
- Click on ‘Settings’ on the leftmost menu. A dropdown menu will appear.
- Click ‘Stream’ on this dropdown menu.
- Scroll down to the VOD Settings tab.
- Turn on the toggle switch on ‘Store past broadcasts.’ This will enable VoD and will automatically save live stream broadcasts for 14 days. 60 days if you are a Prime or Turbo user or a Twitch partner.
Disabling Video on Demand Can Boost Your Twitch Streaming Career
Let us conclude with a pro-tip that can easily boost your Twitch growth and bring your account to the next level:
Make a video on demand unavailable for your regular streaming videos. This way, you train your fans to treat your live-streaming as exclusive, must-watch sessions that they should not ever miss.
Only make VoDs for milestone key moments of your Twitch channel like anniversaries or special sessions that define your Twitch and act as your portfolio for people who want to know who you are.

- Mastering Social Media: Tips and Strategies for Effective Marketing - October 3, 2023
- Harnessing the Power of Social Media for Elevating Customer Service - October 3, 2023
- Social Media Marketing Insights and Strategies for Success - October 3, 2023