

Saving streams as video-on-demand content has not always been the norm on video streaming platforms. But Twitch has changed all that by enabling its content creators to save past broadcasts for video on demand or VOD content.
This feature is not enabled by default on the Twitch platform, and this short read aims to teach you how you can enable saving live stream broadcasts as Twitch VOD content on your Twitch channel.
Read on and learn how to save your Twitch streams as on-demand content on your Twitch channel.
Table of Contents
Why Save and Use VODs?
- It is free! – Take advantage of this feature while it is still free. You never know when social media platforms will decide to monetize their exclusive features through upgraded memberships and the like.
- VOD content act as your Twitch portfolio – Visitors to your channel will get an idea of what you are all about upon viewing your VOD content.
- VOD content entertains fans even when you are offline – Give your fans something to watch even if you are not currently broadcasting a live stream.
- You can save highlights and upload videos indefinitely as VOD content – you can upload other videos and highlights as VOD content and these will stay on your Twitch longer than your VOD live stream broadcasts.
- Please your sponsors with VOD content – Sponsors who have their graphics on your VOD content will be pleased to know that they will still be visible beyond your live stream broadcasts.
How to Save Your Streams on Twitch
To save your Twitch live-streaming sessions as video-on-demand content on your Twitch channel, you will have to enable your Twitch’s ability to store past broadcasts you have done.
Follow these steps on how to save Twitch streams as video-on-demand content on your Twitch channel:
- Visit Twitch.com on a web browser like Google Chrome, MS Edge, or Mozilla Firefox.
- Sign in to your Twitch account.
- Click on your profile picture icon to reveal a dropdown menu.
- Click on the ‘Creator Dashboard’ tab on the dropdown menu.
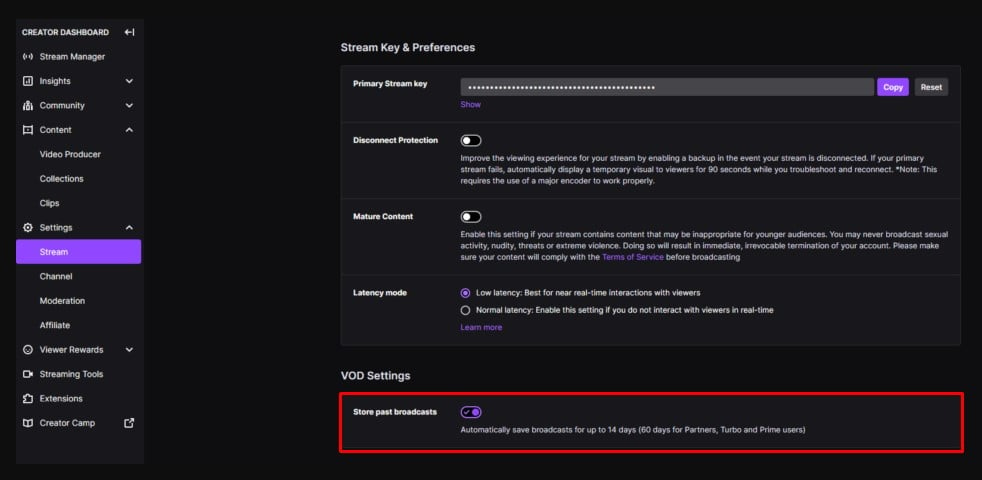
- Click the gear icon on the left-most menu to open the settings of your Twitch Creator Dashboard.
- Click on ‘Stream’ on the settings menu that follows.
- Scroll down to the Twitch ‘VOD Settings.’
- Turn on the toggle switch to the ‘Store past broadcasts’ option. This will automatically save your live stream broadcast sessions as VOD content for 14 days.
Note that Partners and Amazon Prime members will have their past live stream broadcasts as video-on-demand content on their Twitch for 60 days.
How to Download your Own Video on Demand Content on Twitch
Since video-on-demand content of past live stream broadcasts is temporary on the Twitch video streaming platform, it could be wise to save and download your VODs to your hard drive.
You could use these videos for other valuable endeavors on other social media platforms or even on Twitch as uploads and highlights.
Here is a step-by-step Twitch guide on how you can download your own Twitch video-on-demand content to your desktop PC’s hard drive:
- Visit Twitch.tv on a web browser like Google Chrome, Mozilla Firefox, or MS Edge.
- Sign in to your Twitch account.
- Click on your profile picture icon to reveal a dropdown menu.
- Click on the ‘Creator Dashboard’ option on the dropdown menu.
- Click on the ‘Content’ represented by a frame of film on the left-most menu on the Creator dashboard.
- Click on ‘Video Producer’ on the subsequent menu.
- This will reveal all your video-on-demand content videos that you can download.
- Click on the VOD content that you wish to download onto your hard drive.
- There will be a download option at the topmost portion of your screen.
- A directory window will appear for you to specify what folder you want to download the VOD content to.
- Click Save, and you will now get to download your VOD content to your hard drive.
How to Find Your Saved VODs
Here are the steps you can follow to find your VOD videos on your Twitch channel:
- Visit Twitch.tv on a web browser like Google Chrome or Mozilla Firefox.
- Sign in to your Twitch channel account.
- Click on your profile icon at the top-left of your screen.
- Click on the ‘Channel’ option on the subsequent dropdown menu.
- You will see your recent broadcast VODs on the Channel home screen.
- Click on the ‘Videos’ tab to see your uploads and highlights.
In Conclusion
Saving recent broadcasts into VOD content can help promote Twitch growth for your channel. Enable this feature on your Twitch channel now and maximize your broadcast with the power of video on demand.

- Mastering Social Media: Tips and Strategies for Effective Marketing - octobre 3, 2023
- Harnessing the Power of Social Media for Elevating Customer Service - octobre 3, 2023
- Social Media Marketing Insights and Strategies for Success - octobre 3, 2023